Touching off tools in CNC milling is the process of accurately measuring a tool’s length or diameter relative to a known reference point on the machine, typically the machine table or a workpiece surface. This crucial measurement, known as the Tool Length Offset (TLO), is stored in the machine’s controller and is essential for ensuring the CNC program can precisely position the tool tip for accurate cuts, preventing machine crashes, and producing parts within tolerance. Common methods range from the simple paper technique for manual setups to highly accurate automated tool probes for production environments.

Table of Contents
- What is Tool Touch Off and Why is it Critical for Accuracy?
- Essential Methods for Touching Off CNC Tools
- Which Tool Setting Method is Right for You? A Comparison
- A Practical Walkthrough: Setting the Tool Offset in Your Controller
- Pro Tips and Common Mistakes to Avoid
- Conclusion: Mastering Tool Touch Off for Flawless Machining
What is Tool Touch Off and Why is it Critical for Accuracy?
At its core, “touching off” a tool is the act of establishing a precise measurement for that specific tool. Every tool you place in a CNC machine—from a tiny 1/8″ end mill to a large face mill—has a different length. The machine controller has no inherent knowledge of this length. It only knows the position of its spindle nose. By touching off the tool, you are telling the controller: “The tip of this specific tool is exactly this far from the spindle nose.” This information is the foundation upon which every Z-axis movement in your program is built, making it one of the most fundamental and critical steps in any CNC milling setup.
Defining the Tool Length Offset (TLO)
The Tool Length Offset, or TLO, is the numerical value that represents the distance from the machine’s reference position (often the spindle face at its home Z-position) to the tip of the cutting tool. Each tool in the tool changer will have its own unique TLO value stored in the machine’s offset library, typically designated by an H-number that corresponds to the tool number (e.g., T1 uses H1, T2 uses H2). When the controller knows this offset, it can accurately calculate how far to move the Z-axis to place the tool tip precisely at the programmed depth, regardless of how long the tool actually is.
How Does the CNC Machine Use Tool Offsets?
The magic happens through a specific G-code command: G43. This command is known as Tool Length Compensation. When you run a CNC program, you will see a line like G43 H01 Z1.0. This line instructs the controller to do the following: “Activate the tool length offset stored in register H01, and then move the Z-axis so that the tool tip is at Z1.0 above the workpiece zero.” Without the G43 H01, the machine would instead move the spindle nose to Z1.0, causing the tool to either cut air far above the part or, more catastrophically, crash deep into it. The TLO makes your program independent of the actual tool length, allowing you to use different tools without rewriting the G-code.
The Consequences of Incorrect Tool Offsets: Crashes and Scrapped Parts
An incorrect tool offset is a direct path to failure. If the TLO value is too large (telling the machine the tool is shorter than it is), the tool will not reach the part and will cut air, resulting in a scrapped workpiece. Conversely, and far more dangerously, if the TLO value is too small (telling the machine the tool is longer than it is), the tool will plunge deeper than intended. This can lead to a catastrophic crash, damaging the tool, the workpiece, the workholding, and even the machine spindle itself. Precision in this step isn’t just about making good parts; it’s a critical safety procedure.
Essential Methods for Touching Off CNC Tools
Machinists use a variety of methods to touch off tools, ranging from simple, time-tested manual techniques to sophisticated, fully automated systems. The best method for you depends on your machine, budget, and the level of precision and speed your work demands.
Method 1: The Manual “Paper Trick” – A Beginner’s First Step
The paper method is the most basic and accessible way to touch off a tool in the Z-axis. It requires no special equipment, just a small piece of paper (typically about 0.003″ or 0.075mm thick). This technique is perfect for hobbyists, one-off jobs, or as a reliable backup method. The principle is to slowly lower the tool towards a reference surface (like the top of the workpiece or a 1-2-3 block) with the paper in between. The point at which the paper has a slight drag but can still be moved is your zero point.
To perform the paper touch-off, first clean both the tool tip and the reference surface. Place the paper on the surface and use the machine’s jog controls or MPG (Manual Pulse Generator) to slowly lower the Z-axis. As you get close, slide the paper back and forth. When you feel the tool just start to catch the paper, you’ve found your position. You would then set this Z-position in your controller, making sure to account for the thickness of the paper. While not the most precise, it’s a surprisingly effective method when done carefully.
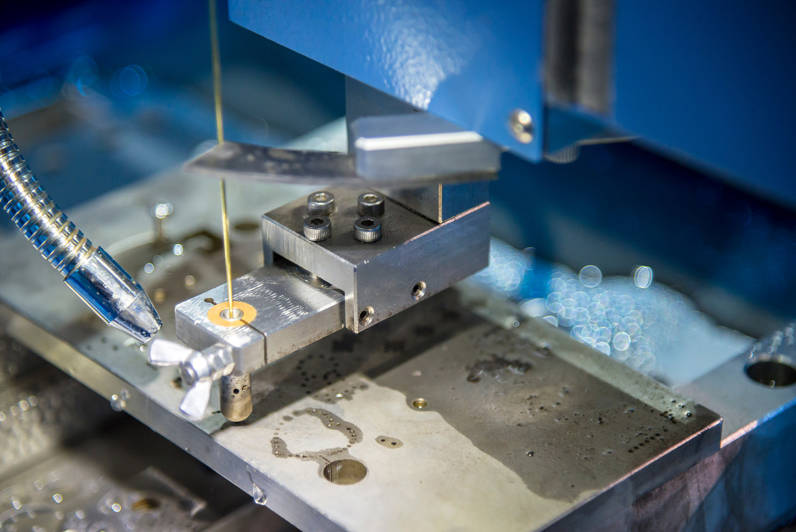
Method 2: Using a Z-Axis Setter (Touch-Off Gauge)
A Z-Axis Setter, also called a touch-off gauge or Z-presetter, is a significant step up in accuracy and repeatability from the paper method. These are precision-ground blocks, often with a known height (e.g., 2.0000 inches), that contain a built-in dial indicator or an electronic sensor that lights up on contact. You place the setter on your reference surface and bring the tool down onto its plunger. When the dial indicator reads zero (or the light turns on), the tool tip is exactly at the known height of the device.
The process is straightforward and less subjective than feeling for drag on paper. After positioning the tool over the setter, you lower the Z-axis until the gauge is activated. You then read the machine’s Z-position from the controller’s screen and subtract the known height of the setter. This final value is your tool length offset. This method is much faster and more consistent, making it a favorite in many job shops.
Method 3: The Automated Tool Touch Probe (Tool Setter)
For high-production environments where speed and ultimate precision are paramount, an automated tool touch probe is the gold standard. This is a high-precision device permanently mounted inside the machine. When a tool needs to be measured, a simple macro program is executed. The machine automatically moves the tool over to the probe, touches it in a controlled sequence (often rotating to check for runout), and instantly calculates and records the tool length and/or diameter offset in the correct register. The entire process takes only a few seconds per tool.
The main benefits of an automated tool setter are undeniable: it virtually eliminates human error, provides sub-micron repeatability, and dramatically reduces setup times. It can also be used for in-process tool breakage detection. The primary drawback is the significant initial cost for the hardware and installation, which places it outside the budget of many smaller shops and hobbyists.
A Note on X/Y Offsets: Edge Finders and Workpiece Probes
While this article focuses on the Z-axis tool length offset, it’s important to distinguish it from finding the X and Y zero point of your part, which is part of setting the Work Coordinate System (WCS). For the X and Y axes, machinists use tools like mechanical or electronic edge finders to locate the edge of the part. More advanced machines use a similar probe technology, a workpiece touch probe (like a Renishaw probe), to automatically locate edges, corners, or the center of a bore to set the WCS (e.g., G54). While a workpiece probe can also be used to touch off tools on the Z-axis, its primary function is different from a dedicated tool setter.
Which Tool Setting Method is Right for You? A Comparison
Choosing the right method involves balancing the need for accuracy and speed against your budget and the type of work you do. Here is a comparison to help you decide:
| Method | Typical Accuracy | Speed | Cost | Best For |
|---|---|---|---|---|
| Paper / Feeler Gauge | ~ +/- 0.001″ (0.025mm) | Slow | Negligible | Hobbyists, one-off parts, setups without dedicated tools. |
| Z-Axis Setter | ~ +/- 0.0002″ (0.005mm) | Moderate | $50 – $300 | Job shops, small businesses, and serious hobbyists seeking consistency. |
| Automated Tool Probe | < +/- 0.0001″ (0.0025mm) | Very Fast | $1,500 – $10,000+ | High-production environments, high-precision manufacturing, lights-out machining. |
A Practical Walkthrough: Setting the Tool Offset in Your Controller
While the exact buttons vary between controllers (e.g., Fanuc, Haas, Siemens), the underlying process for setting a tool offset is universal. Here is a generic, step-by-step guide.
Step 1: Call Up the Tool and Position It
In your MDI (Manual Data Input) screen, load the desired tool into the spindle. For example, type T01 M06; and press Enter. Once the tool is in the spindle, use the jog controls to move the tool to a safe position directly above your chosen reference surface (the top of your part, a 1-2-3 block, or your Z-axis setter).
Step 2: Perform the Touch-Off Using Your Chosen Method
Carefully execute one of the methods described above. Slowly lower the tool in the Z-axis until you achieve contact, whether it’s the drag on a piece of paper, the zero on your dial indicator, or the light on your electronic setter. Do not move the Z-axis again after this point. The machine’s position is now what needs to be recorded.
Step 3: Navigate to the Tool Offset Page
On your controller, find the “Offsets” page. There will be separate pages for Work Offsets (G54, G55, etc.) and Tool Offsets. Go to the Tool Offset library. You will see a list of tools (T01, T02, etc.) with columns for Geometry, Wear, Radius, etc. We are interested in the Length Geometry column.
Step 4: Input the Measured Value
Highlight the Length Geometry field for the correct tool (e.g., T01). Most modern controllers have a soft key that says “Tool Offset Measure,” “Z Face Measure,” or something similar. When you press this button, the controller will automatically capture the current Z-axis Machine Position and populate it into the field. If you used a setter of a known height (e.g., 2.000″), you would then manually subtract that value from the number entered.
Step 5: Activate the Offset in Your Program
The offset is now stored, but it does nothing until you call it in your program. Remember to include the G43 H[tool number] command in your code after each tool change. For example, after a tool change to Tool 1, your program should have a line like G43 H01 Z2.0; to activate the compensation and move the tool safely above the part.
Pro Tips and Common Mistakes to Avoid
Mastering the process involves more than just following the steps; it’s about building consistent, safe habits.
Always Double-Check Your Numbers
Typographical errors are a common source of crashes. After setting an offset, glance at the value. Does it look reasonable? Is it wildly different from other tools of a similar type? A simple sanity check can save you from a very expensive mistake. Many machinists will perform a “dry run” by running the program several inches above the part to visually confirm the toolpaths and depths look correct.
The Importance of a Clean Surface
A tiny chip or a burr on your reference surface, workpiece, or tool setter can throw off your measurement significantly. Always wipe down all contact surfaces before touching off a tool. This simple act of shop discipline is a hallmark of a professional machinist and is critical for achieving consistent accuracy.
Understanding Machine Position vs. Relative Position
Your controller displays multiple coordinate systems. Machine Position is the absolute distance from the machine’s home position. Relative Position (or Operator) is a temporary coordinate that can be zeroed at any time. When setting tool length offsets, you almost always want to use the Machine Position value, as it is a constant, reliable reference point.
Forgetting to Activate Tool Length Compensation (G43)
This is arguably the most common mistake beginners make. You can have every tool offset in your library set perfectly, but if you forget to include the G43 H## command in your program, the machine will ignore them entirely. The result is often a rapid Z-axis move that drives the spindle, not the tool tip, to the programmed coordinate, causing a severe crash.
Conclusion: Mastering Tool Touch Off for Flawless Machining
Touching off tools is not just a preliminary task; it is the very definition of setting the stage for precision. It is a skill that directly translates to the quality of your finished parts and the safety of your machine operation. By understanding the “why” behind tool length offsets and mastering a consistent, repeatable “how” for measuring them, you gain fundamental control over the CNC milling process. Whether you use a simple piece of paper or a fully automated probe, the principles of accuracy, cleanliness, and double-checking your work will always be the keys to success.
Anchor Text Suggestions
- What is Tool Length Offset (TLO)?
- How to use a Z-axis setter
- Comparing CNC tool setting methods
- Common mistakes in CNC setup
- Understanding G43 tool length compensation
cnc tool touch off, how to touch off tools cnc milling, setting tool offsets, tool length offset, cnc milling setup, G43 tool length compensation, what is tool length offset, manual tool touch off with paper, how to set z offset on a cnc mill, using a tool presetter for cnc, CNC touch probe setup